On Sunday I took the Jam Making 101 class at Blue Chair Fruit Company in Oakland! I had a delicious time learning from Rachel Saunders, the woman behind Blue Chair Fruit Company! I’ve had her cookbook for awhile and I’ve wanted to make my own jam, but I lacked the confidence & drive to get going. This class definitely gave me the jump start I needed. I can’t wait to go to the farmer’s market this weekend to pick up some fruit. Also, I should note that I completed another item from my 31 comes before 32 list ! #16. Learn how to do canning!
The goal of the class was not to just follow a recipe and make jam, but to understand the elements of jam, how to test for balance prior to cooking and how to preserve a fruit’s flavor integrity while making a jam. In the class, we made 4 different variations of a Strawberry Raspberry Jam. Two of the jams were original recipes and the other two were based on what we, as a class wanted in a jam. I can’t wait to taste the final results (which should show up in my mailbox soon!).

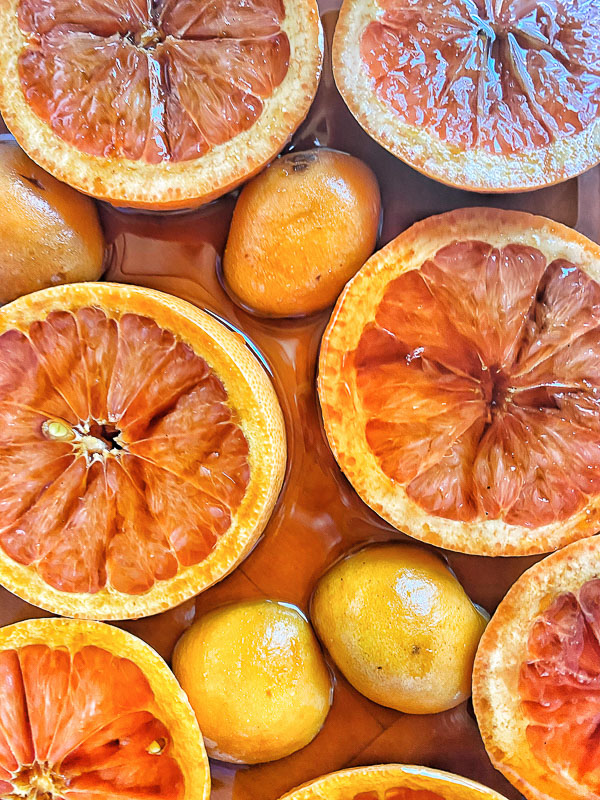
We started by tasting a few of Blue Chair’s jams. This was probably my favorite part because I immediately fell in love with the Early Summer Peach Marmalade! It’s ah-mazing. I also loved the spice in the East Coast Blueberry Jam (there was a cinnamon stick IN the jar!) and the Cranberry Jam tasted like summer Thanksgiving! The Lemon & Pink Grapefruit Marmalade was a bit too bitter for my liking, but still neat to try. We observed the color, texture, sweetness, balance, and the flavor profile of each one.

After our jam tasting, we went into the kitchen and had a few savory treats while things were being set up for us.

Look at all of the strawberries and raspberries for jam making! They are all organic and bursting with flavor.

Rachel showed us the two different batches of fruits we would be working with first. One bin was filled with cut strawberries & sugar that had been in the fridge for 4 days. The other was filled with whole strawberries and sugar and was started at the same time as the cut ones. Adding this step to the process reduces cooking time because most of the work is taken out of the equation when the berries let out their juices with the help of sugar. The cut strawberries gave off a ridiculous amount of juice and dissolved the sugar compared to the whole strawberries, which still had a lot of sugar granules leftover.

Here’s Rachel stirring the berries after adding some fresh lemon juice.

We all dipped clean spoons in & tasted every time she added more lemon juice, to make the perfect balance.

And then we got to cooking the jam!

This jam was a raspberry HEAVY jam, so we added the raspberries after a somewhat long period of cooking time. Each of the jams had a different cooking time because the amount of fruit, size of fruit and sugar was modified for the flavor profile.

Here’s some foaming action!

Rachel taught us how to use the freezer/spoon technique to test for done-ness. So cool!

And when the jam was ready, she showed us how to skim off all of the foam for a clear, pure jam.

We made two more batches of Strawberry RaspberryJam. This was a collaborative effort! We got to decide what we wanted in a jam!

So we were put to work chopping and measuring out the recipe she created for us based on our ideas.

After more cooking, it was time to load up the jars. Here, I learned the two pitcher technique! One messy pitcher. One clean pitcher. Pour the messy pitcher contents into the clean one and then fill the jars with that one! I will totally be implementing this technique at home, as I’m a huge mess maker.

Rachel uses an oven to heat/sterilize the jars and when they are filled & lidded, they go back into the oven for another 15 minutes to seal.

Here we are pouring the jam into the jars.

Look at our bounty! So exciting!

This is just one of the four types of Strawberry Raspberry Jam we made!

And here they are lidded and ready to go into the oven.

Between jams, we took a break and Rachel served the class a DELICIOUS Citrus Almond cake with Raspberry jam & fresh raspberries that she made. It was TASTY! I totally want the recipe! We sat around eating cake and drinking tea, while talking about jam.

And after the class, I was able to pick up some goodies for my GIVEAWAY! Stay tuned!

So there you have it. I learned how to make jam & can!
What impressed me most about the class was Rachel’s oven technique. No boiling water= no fuss. I can’t wait to try this at home because it seems to have taken away a huge amount of danger! Water baths seem daunting for a kitchen klutz like myself.
I think another invaluable lesson from the class was learning how to tap into the visual clues and testing for the jam’s doneness. I don’t think I would have been able to figure that out on my own. The key is to bring a fruit to it’s brightest point and if you overcook it, you won’t achieve that!
I also learned that the amount of sugar in a jam has a lot to do with its final texture! So if you are wanting to make a low sugar jam, know that you are messing with its structural integrity. The sugar is worth the end result. Also- those COPPER pots are BEAUTIFUL and pretty crucial to making great jam making! Blue Chair Fruit sells them as well as their jam on their website.
If you want to take a class from Blue Chair Fruit Company, check out their website! I highly recommend it.
Blue Chair Fruit Company
4629 MLK, Jr. Way
Oakland CA 94609
(510) 654-BLUE